Elden Ring: A Comprehensive Guide to Yelough Anix Tunnel in 2026
Explore the rewarding Yelough Anix Tunnel in Elden Ring, a standout optional dungeon with valuable loot and thrilling challenges for Tarnished adventurers.
In the vast and treacherous world of Elden Ring, optional dungeons remain a cornerstone of the experience, offering dedicated Tarnished a chance to test their mettle for powerful rewards. While some, like the repetitive catacombs or notoriously difficult hero graves, can feel like a chore, crystal tunnels consistently stand out as worthwhile endeavors. Among these, Yelough Anix Tunnel has solidified its reputation as one of the more rewarding and efficiently designed dungeons, even years after the game's initial release. Its relatively short length and valuable loot make it a prime target, but don't be fooled—this icy cavern is home to formidable foes and requires a significant journey just to reach its entrance.
How To Reach The Yelough Anix Tunnel
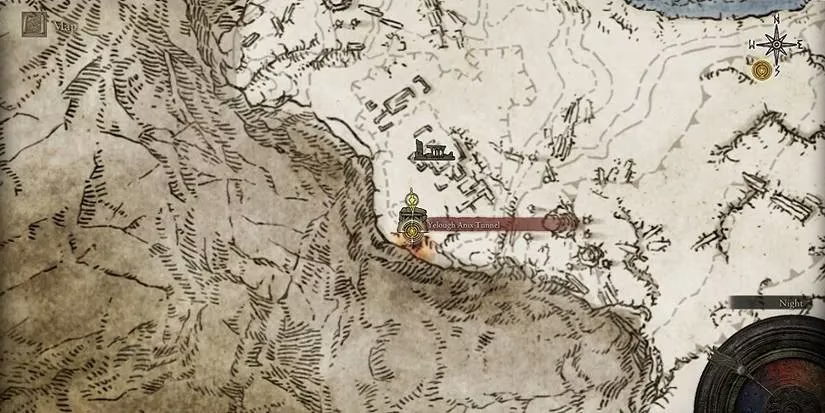
Finding the Yelough Anix Tunnel is an adventure in itself. This dungeon is hidden within the Consecrated Snowfield, a secret and frigid region west of the Mountaintops of the Giants. Gaining access requires foresight; you must first obtain the two halves of the Secret Haligtree Medallion and use them to activate the Grand Lift of Rold. Once you step into the blinding snow of the Consecrated Snowfield, your journey north begins. After reaching the Consecrated Snowfield Site of Grace, you have two main paths:
-
Head northwest through the obscuring mist.
-
Continue further north to the Inner Consecrated Snowfield Site of Grace, then make your way southwest from there.
The tunnel entrance is cunningly concealed. Your best landmark is the Yelough Anix Ruins. While these ruins hold their own secrets, you can bypass them initially if the tunnel is your goal. Navigate past the crumbling structures, and you'll discover a narrow path leading into the mountainside. Enter the cave and descend via the lift to officially begin your exploration of the Yelough Anix Tunnel.
Yelough Anix Tunnel Walkthrough
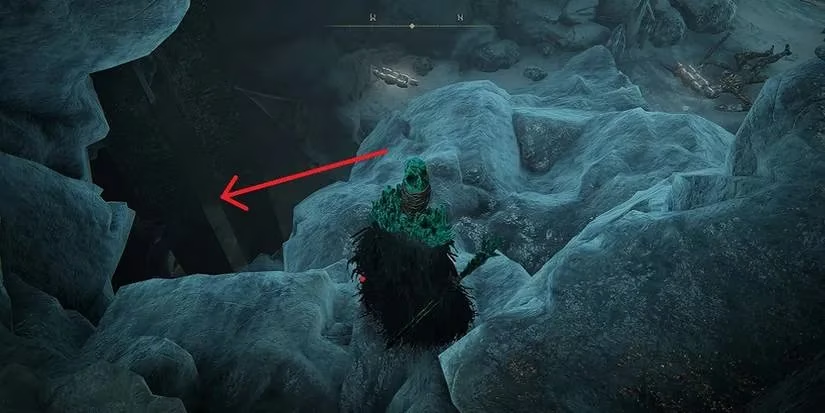
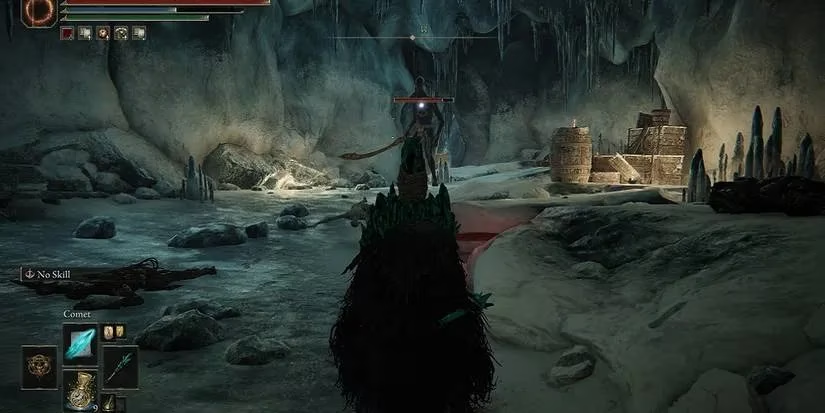
Your descent into the crystal-lined depths follows a linear but perilous path. Proceed until you encounter a locked wooden door. With the way forward blocked, look left for a hole in the wall. Make your way down the hole, but be ready! Two seemingly dormant miners will spring to life as you land. A cautious player can use target-locking from the platform above to dispatch them safely. Loot the area for 3x Freezing Grease and a Smithing Stone (8), then continue down the adjacent tunnel. Exiting this tunnel triggers another ambush from a miner on your right.
This room holds more danger and treasure. Deal with two additional miners and collect a Golden Rune (10). Your path forward requires a short jump over a chasm. On the other side, a brief tunnel leads to another cavern. Eliminate the waiting miner and claim a Somber Smithing Stone (8) and 6x Explosive Stone Clump before ascending a ladder. The next floor harbors two more miners, with one specializing in a surprise attack from behind. Is it wise to focus on the ambusher first? Dispatch both threats and secure another Somber Smithing Stone (8) before climbing the next ladder.
The top floor presents a new challenge. A tunnel opens into a cavern dominated by a swirling gravity portal. The portal will spawn an Onyx Lord as you approach. This formidable enemy wields powerful gravity Sorceries, but by the time you reach this area, your character should be well-equipped to handle him. After his defeat, scour the room to find a Somber Smithing Stone (9) and a Hero’s Rune (5). Proceed to the next chamber and finally open the wooden door that was previously blocked, creating a useful shortcut.
Now, you face a choice: confront the final boss or explore a hidden lower area. For completionists, the latter is essential. Return through the newly opened door and backtrack to the cavern with the small chasm. This time, instead of jumping across, use the nearby ladder to descend to the bottom floor. A turn reveals a small side room with two miners guarding a corpse holding a Rune Arc.
Returning to the main cavern, you'll spot another gravity portal. This portal spawns an Alabaster Lord, a foe very similar to the earlier Onyx Lord. His defeat guarantees the Alabaster Lord’s Sword (if you don't already possess it). The cavern also hides 2x Smithing Stone (8) and the incredibly valuable Ancient Dragon Smithing Stone.
The Final Confrontation: Astel, Stars of Darkness
With the optional areas cleared, it's time for the main event. Remember to take the newly opened shortcut on the way back if you need to visit the Site of Grace, as the Onyx and Alabaster Lords are not bosses and will respawn if the area resets.
The boss of Yelough Anix Tunnel is Astel, Stars of Darkness. This is a stronger variant of Astel, Naturalborn of the Void, encountered earlier in the Grand Cloister. While its colossal, alien form is intimidating, its movements are deliberate and its attacks are heavily telegraphed. Patience and well-timed dodges are key. Emerging victorious grants you the Meteorite of Astel, a Sorcery that remains one of the most devastating spells in the game even in 2026, capable of calling down a shower of cosmic projectiles upon your foes.
Loot Summary Table
| Item | Quantity | Location/Enemy |
|---|---|---|
| Freezing Grease | 3x | First lower cavern |
| Smithing Stone (8) | 1x | First lower cavern |
| Golden Rune (10) | 1x | Chasm room |
| Somber Smithing Stone (8) | 2x | Lower tunnels & upper floor |
| Explosive Stone Clump | 6x | Across the chasm |
| Somber Smithing Stone (9) | 1x | Onyx Lord's room |
| Hero’s Rune (5) | 1x | Onyx Lord's room |
| Rune Arc | 1x | Bottom floor secret room |
| Alabaster Lord’s Sword | 1x | Dropped by Alabaster Lord |
| Smithing Stone (8) | 2x | Alabaster Lord's cavern |
| Ancient Dragon Smithing Stone | 1x | Alabaster Lord's cavern |
| Meteorite of Astel | 1x | Dropped by Astel, Stars of Darkness |
In conclusion, Yelough Anix Tunnel exemplifies the rewarding side of Elden Ring's optional content. It efficiently packages challenging encounters, valuable upgrade materials, and a unique boss fight into a compact space. The journey to find it and the battles within are a true test for any Tarnished, but the spoils—especially the top-tier Sorcery and smithing stones—make every effort worthwhile.